
1. Introduction
3.1. How to access VersionWeb?4. Files Management
3.2. How each user is validated?
4.1. Doing a local checkout5. Users Management
4.2. Doing a remote checkout
4.3. Changing a text file using a remote checkout
4.4. Creating a directory inside the repository
4.5. Adding a file inside the repository
4.6. Creating a branch
4.7. Visualizing differences between two versions
4.8. Showing the history of a file
4.9. Listing versions and branches
4.10. Doing a checkout of a specific version or of a branch
4.11. Removing changes between two versions
5.1. Adding, removing, changing and transferring users6. Specific Groups
6.1. Retrieving versions1. Introduction
6.2. Viewing differences between two versions
6.3. How to receive notification about new versions
6.4. Sending suggestions about the page
The World Wide Web has been presented as an environment where information evolves very rapidly. Because the Web information changes so much and so frequently, browser users usually become surprised when previously available information is no longer available. In the face of such problem, a software tool named VersionWeb is presented. The idea behind the tool is to make Web page version control available during browsing by users. The main goal of VersionWeb is to provide Webmasters with an easy way of controlling Web page versions, through the Web itself.
The Web information is a new approach to Information Technology. Thus, the development of Web applications can be seen as a new kind of software development. Recently, many software companies are starting gradually to adopt the disciplines of Software Configuration Management (SCM) as usual routines for software development. The changing process is a reality for large software systems. Changes are required throughout all life cycle of a system. During the development of large-scale software, uncontrolled modifications come up and can lead quickly to chaos. Thus, change management procedures must be carried out to ensure that costs and benefits could be analyzed and changes could be controlled. Developers of Web pages (authors or webmasters) face a hard job when many people are involved in the parallel development of sets of related HTML pages. As authors can work independently in their individual page copies, the integration of the copies in a final hyperdocument (merging two or more versions) becomes a known problematic issue. In addition, the volume of the involved documents usually is high, modifications in the documents happen fast and the modifications are difficult to track. In fact, to provide an efficient mechanism the change control should combine human procedures with automatic tools.
VersionWeb was developed to provide Webmasters with an easy way of controlling the Web page versions, through the Web itself. Additionally, during Web browsing the user is able to recover previously available information from the Web page, to visualize the differences between different versions of the page and to be notified when new versions of it become available. Another goal of the tool is to facilitate the cooperation among authors, allowing them to have simultaneous access to the files, to manage the different versions of a file, and to locate changes that have been made.
To provide its main functional feature, VersionWeb uses CVS (Concurrent Version System). CVS is an efficient file version control system. It allows simultaneous access to a file. The access can be made through a network and it is possible to visualize the differences between two file versions (except for binary files) as well as it can run under several operating systems. This work complements CVS by providing a Web-based interface for a friendlier interaction, since CVS has only a command-oriented interface.
The following sections describe the main interfaces of the VersionWeb.

VersionWeb is composed by three basic interfaces:
There are three basics types of users of the VersionWeb: administrators (people authorized to manage all users of the VersionWeb), authors (people authorized to manipulate the files that are in the CVS repository) and browser users (people that can only retrieve versions for page visualization and for visualizing differences between two versions).
- Users management
- Files management
- Pages versions lists for browser users
The
users management is made by the administrators on the web. The basic interface
for users management is shown in Figure 1.
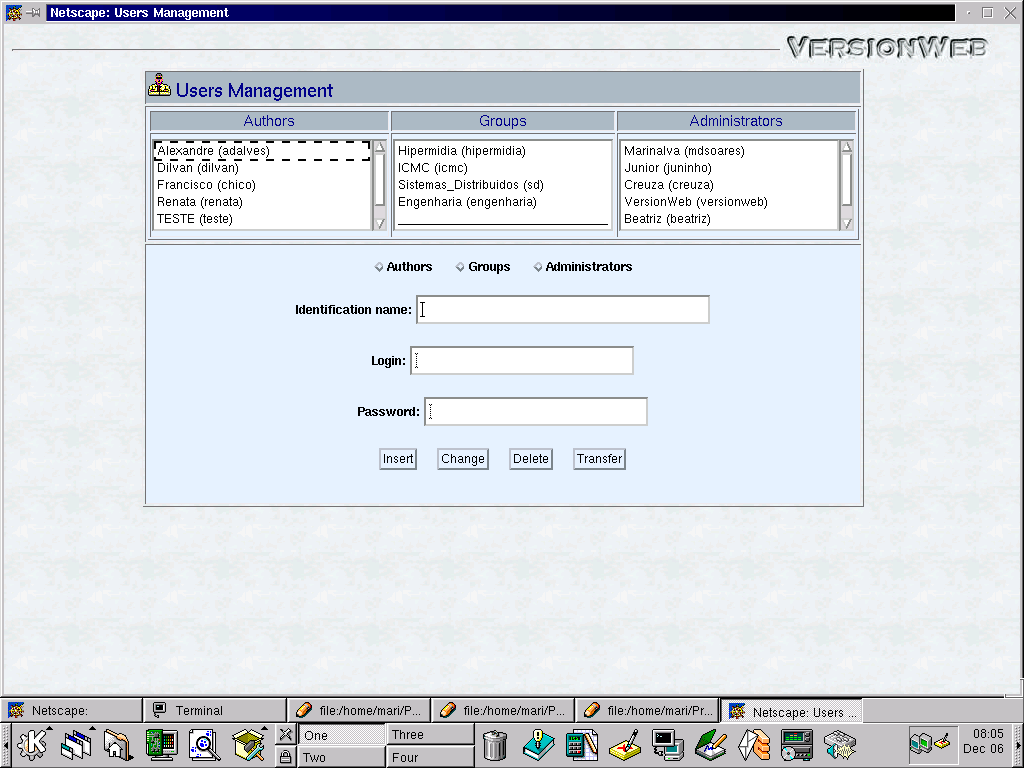
Figure 1 - Users management interface
This interface shows the list of users of the VersionWeb (authors, administrators and specific groups of browser users). Through this interface is made the maintenance of users, tasks such as: add an user to the list of users of the VersionWeb, remove one user from a list, change data of users like name, login and password from a list and transfer users from one list to another.
The
files management is made by the authors on the web. Figure 2 shows
the main interface for file management.
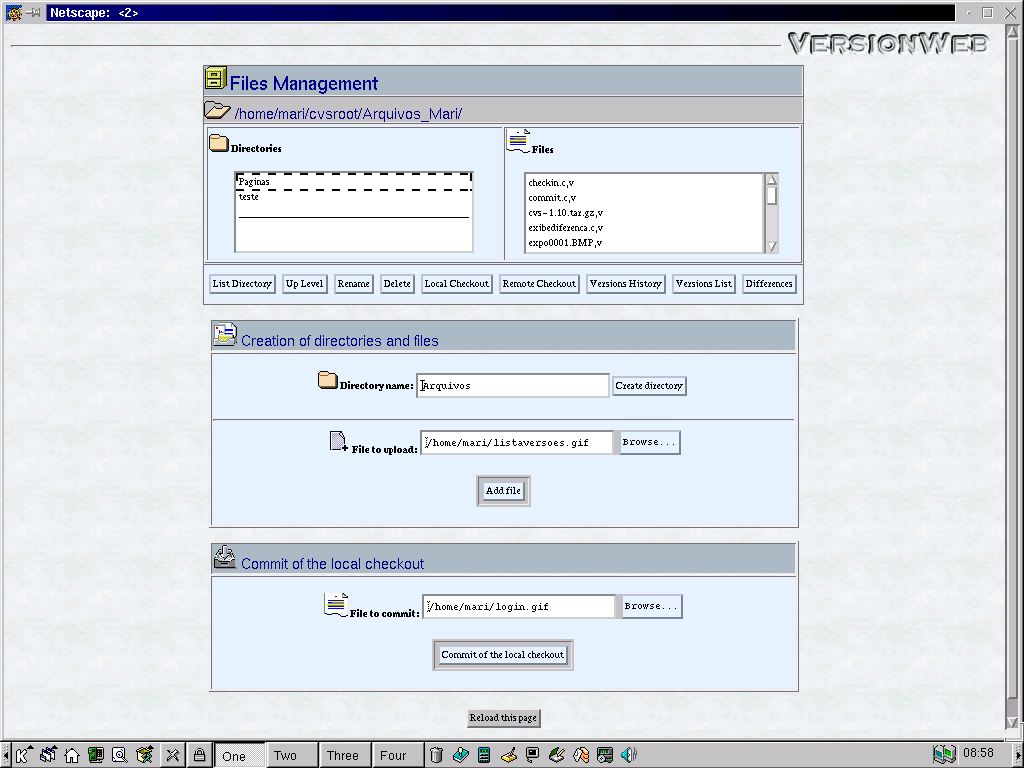
Figure 2 - Files management main interface
Through the file management interface more common CVS operations can be executed. All the file control is done by the authors on the Web, so that their actions are registered in the server by the CVS.
The interface that the browser users can access (through a link in the page which the user is visiting) is illustrated in Figure 3. The author should to include a link in the page for the VersionWeb. If the author wants that only specifics groups of browser users access the versions of the page, he has to do the following:
<a href="hostname/versionweb.cgi?caminho_repositorio=value&DiretorioPagina=value&nome_pagina=value&>nome_link</a>.
If the author wants that all browser users access the versions of the page, he should put janelagrupos.cgi and not versionweb.cgi in the link. For example:
<a href="hostname/janelagrupos.cgi?caminho_repositorio=value&DiretorioPagina=value&nome_pagina=value&>nome_link</a>.
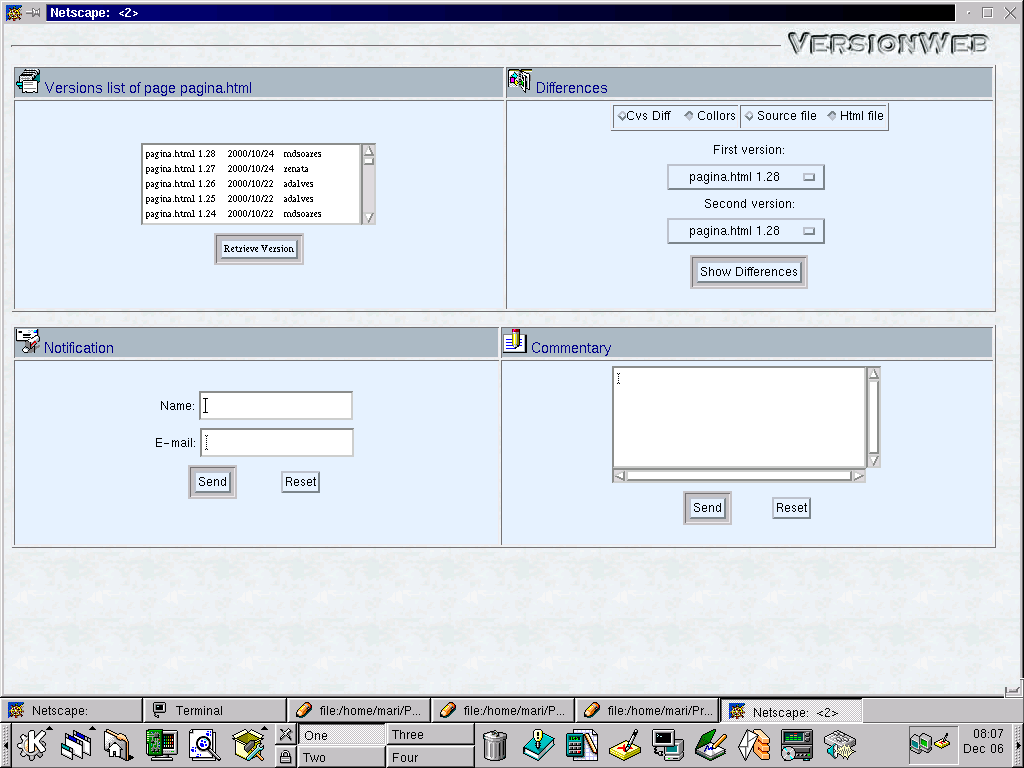
Figure 3 - Versions list for browser users
The interface illustrated in the Figure 3 is accessible by a link that must to be in the page that the user is visiting. The operations available in each interface are explained in more details in the next sections.
There are three types of users in the VersionWeb:
3.1. How to access the VersionWeb?
The
first step to use the VersionWeb is the authentication of an user
This gives him access to the main interfaces of the VersionWeb.
The interfaces are shown depending upon the type of the user loging in
Figure 4 shows the users authentication interface with fields to
entry the necessary data for identification.
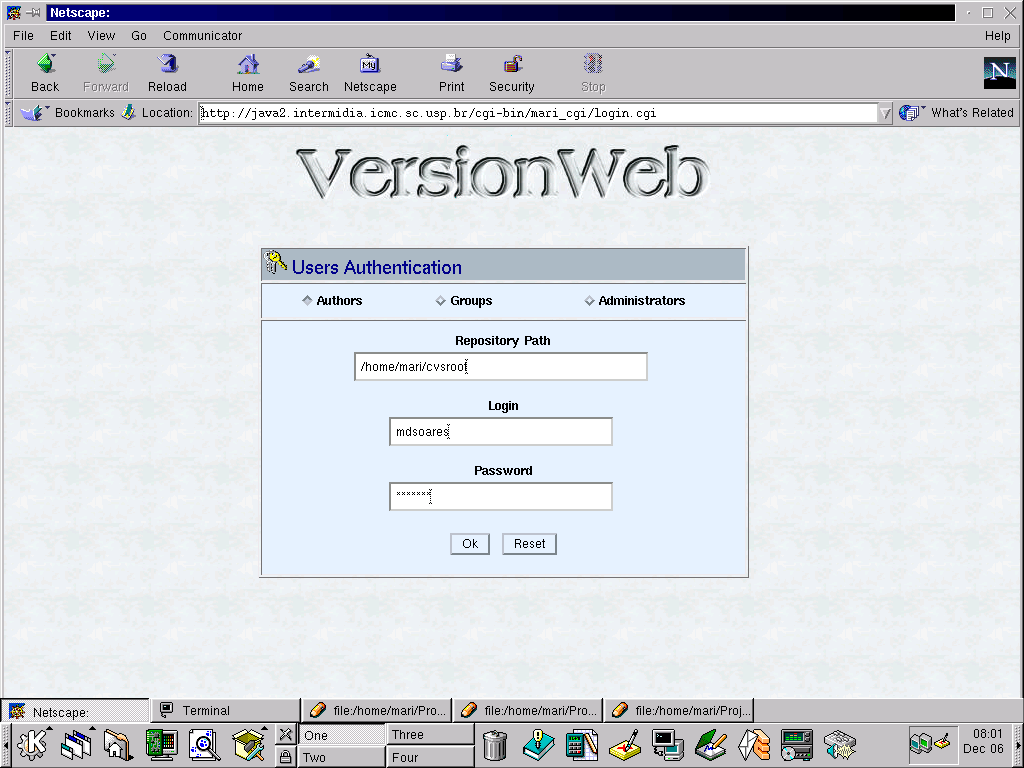
Figure 4 - Users authentication in the VersionWeb
The interface shown in Figure 4 has the following fields for data entry:
Type of user: Authors, Groups or Administrators (options in radio buttons).Repository Path: absolute path where the CVS repository resides within file system in the server.
Login: username for identification of the user.
Password: password of the user.
3.2. How each user should be validated?
If
the validation of an author is ok, he will have access to the file management
window of the repository that he requested at the moment of his login.
Figure
5 shows the content (directories and files) of the CVS repository and
operations allowed in the main file management interface.
Figure 5 - Files management main interface
The available operations are:
1- Directory List: It lists (shows) the content of a selected directory.
2- Up Level: It goes up one level in the directory tree.
3- Rename: It renames the selected file or directory.
4- Delete: It removes the selected file or directory from the repository.
5- Remote Checkout: It makes the remote checkout (current version) of the selected file (this option is only available to text file). This option should be used only to do small changes to files. When an user makes a remote checkout, he gets the interface illustrated in Figure 6.
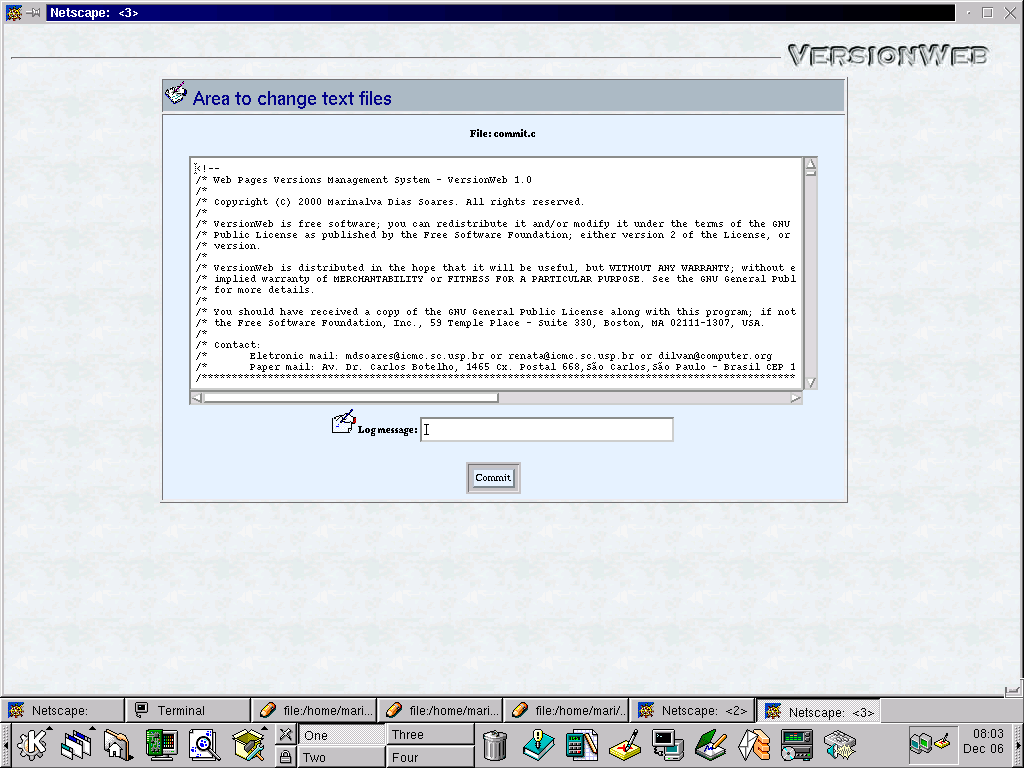
Figure 6 - Interface to change text files when making a remote checkout
Through the interface above, the user can change the content of a file and make the commit (button "Commit") generating a new version. Moreover, the user can write a comment about the changes made in the file in the field "Log message" before making the commit.
6-
Local Checkout: It
makes local checkouts (current version) of the selected file (text or binary
file) or directory to the user's machine. This option should be used to
larger changes, when the commit won't be made very soon. When the user
makes a local checkout, he get the interface shown in Figure 7.
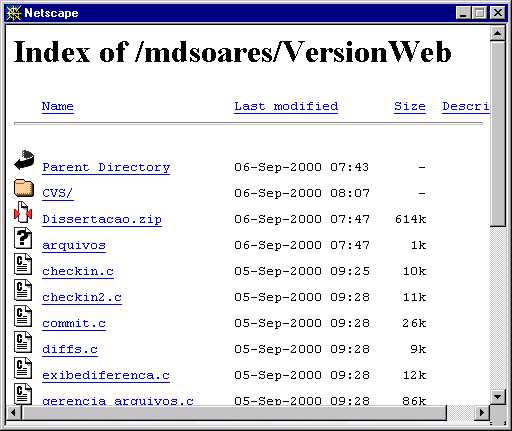
Figure 7 - List of files to download
The interface, shown in the figure above, lists the files for download when the user makes a local checkout of an entire directory. The changes to the files should be made in the user's machine.
7-
Versions History: It opens a new window
with the list of versions of the selected file showing: author, date, hour
and log message. This option is used only for files. Figure 8 shows
the interface with the history of a file. Through this interface, the user
can see all versions of the file, versions's authors, date, hour and comments
of changes.
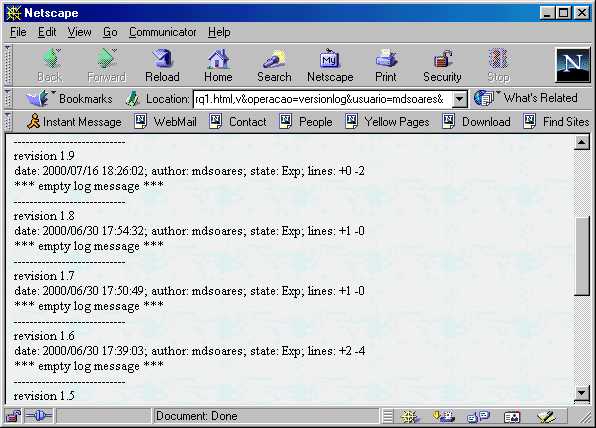
Figure 8 - History log for a file
8-
Versions List: It opens a new window with
the list of versions and branches of a selected file with operations to
local checkout, to remote checkout and to remove changes between any two
versions. This option is used only for files. Figure 9 shows the
interface obtained using this option.
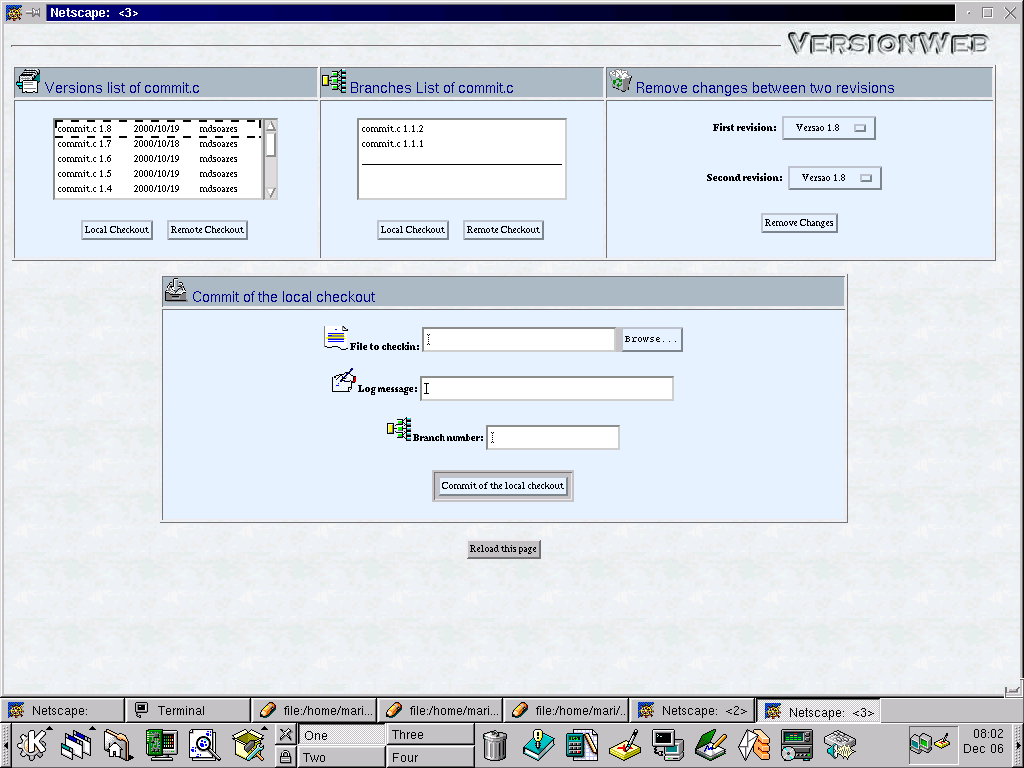
Figure 9 - Versions and branches of a file
The interface, illustrated in Figure 9, offers the following options:
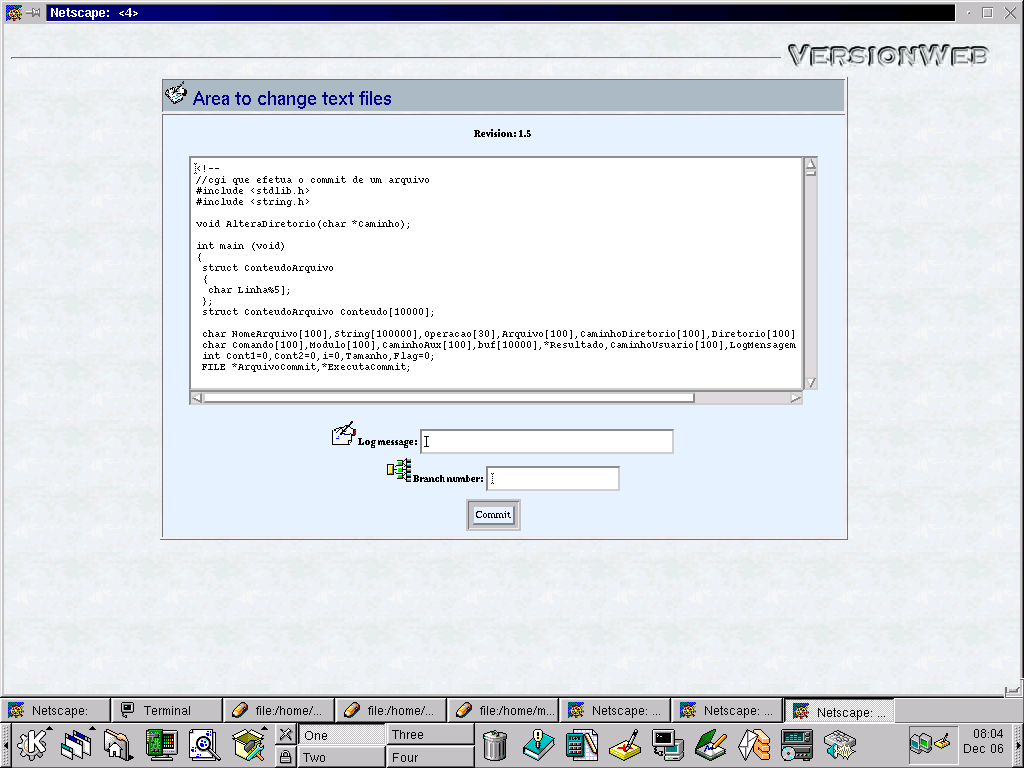
Figure 10 - Area to change text files when make a remote checkout of a specific version
For
example, imagine that there are 3 versions of a file x (versions 1.1, 1.2
e 1.3). If the user does a checkout of the version 1.3, changes it and
makes a commit, the CVS will generate the version 1.4 automatically. But
if the user does the checkout of the revision 1.2, the CVS can not generate
the version 1.3 because it already exists. Then, the user should specify
a number for the version when commit, in this case, a branch (1.2.1 or
1.2.2 or 1.2.3, ...).
9-
Diffs: It opens a new window with operations
to visualize the differences of content between any two versions of the
selected file. The interface obtained through this option is illustrated
in Figure 11.
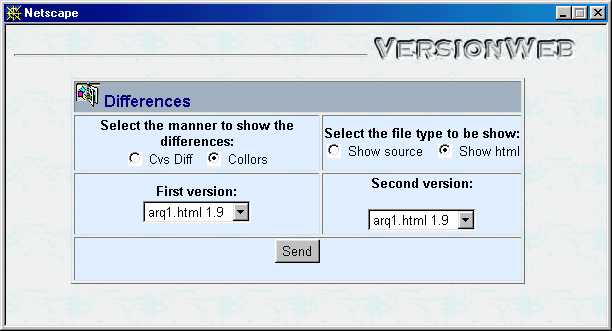
Figure 11 - Versions list to visualize differences
The
author can view differences of content between any couple of the page versions
using colors or CVS text format. Moreover, he can view these differences
using the source of the page or using the page itself (if the file is in
html). The author should select the form for viewing, select two different
versions and click on the button "Show differences". Figure 12 shows
an example of difference visualization by colors.
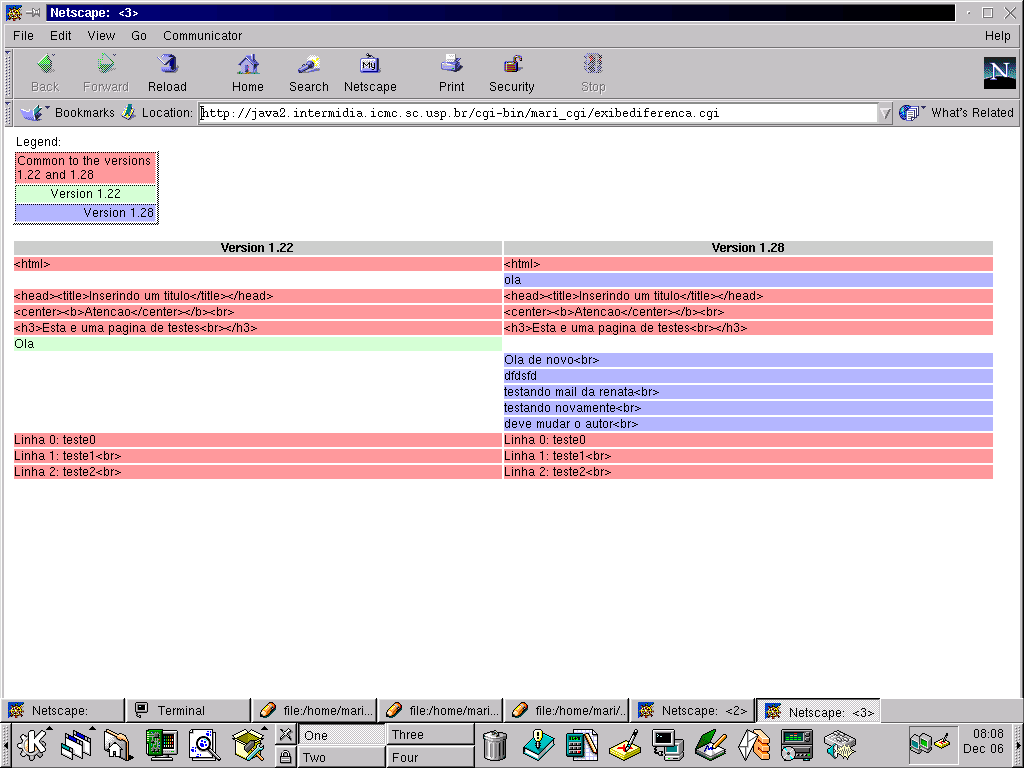
Figure 12 - Visualization differences between two versions of a file (source of a html file) by colors
10- Create directory: It creates a directory inside the repository in the current directory.
11- Add file: It adds a file that is local to the repository in the current directory.
12- Commit of the local checkout: It commits a file which had a local checkout (current version). For this operation, the name of file should not be changed. The author should find the file in his machine and make a commit. A new version will be generated, subsequent to that from which the local checkout was done..
13- Reload this page: It reloads the interface shown in Figure 5 to show recently added files.
If
the validated user is an administrator, he will have access to the interface
for user management of the VersionWeb shown in Figure 13.
It shows the list of users of the VersionWeb (authors, groups and
administrators).
Figure 13 - Users management in VersionWeb
In the figure above, the following operation are allowed:
1- Insert: add an user in one of the lists of users. For this, select the type of user (radio button), fill all the fields and click on the button "Insert".
2- Change: change user's data (name, login and password). For this, select the user in one of the lists, change the data filling the fields and click on the button "Change".
3- Delete: remove a user from a list of users. For this, select the user in one of the lists and click on the button "Delete".
4- Transfer: move a user from one list to another. For this, select the user in one of the lists, select the new list (radio button) and click on the button "Transfer".
6. Specific groups of browser users
If the validated user belongs to a group, he has access to the interface shown in Figure 14. This interface offer four options:
Figure 14 - Versions list for browser users
1- Retrieve version: The user can retrieve any version from the list for viewing through a simple click on the version and a click on the button "Retrieve Version". A new browser window will be opened with the version of the page.
2- View differences: The user can view differences of content between any two versions of a page by colors or by CVS text format. He also can view these differences using the source code of the page or using the view of the page. The user should select these forms for viewing, select two different versions and click on the button "Show differences".
3- Notification: The user can request to receive a notification about a new version of the page. For doing this, he should fill the fields name and e-mail for notification and click on the button "Send".
4- Send comments: The user can send comment and criticism about the page or changes of the page. For doing this, he should fill the field for comments and click on the button "Send".
